Crust or bust: A ridiculously detailed tutorial for those who are scared to make crust

Crust or bust: A ridiculously detailed tutorial for those who are scared to make crust

Written by Emily

“I could never make crust.” That is the #1 reason people give for not making pie. The prepping, making filling and the baking all pale in comparison to how worried people are about making crust. No judgment here – I totally get it. Crust was the bane of my existence for easily the first six months of my year of pie. I poured over books, scoured the internet, and ate more chewy crust than most people do in a lifetime.

I’ve found crust to be more forgiving than most cookbooks make it out to be if you stick to some simple intuitive guidelines. So here is my best shot at giving you some blog-induced courage to go make yourself some crust this Thanksgiving.  You can find my recipe on the main page where it says “crust recipes” or click here.

#1 Be prepared

Before you even think about diving in, make sure you have what you need:
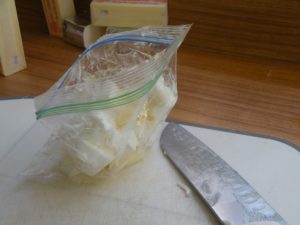
  • Food processor – I know, I know, grandma made it in a bowl with a fork. I don’t care. The food processor has been my best friend. Unlike the bowl/fork method, a food processor builds in less room for error, and that’s what I’m all about when making my crust. I want the road of least resistance and the most forgiveness.
  • Flour – King Arthur, all-purpose flour. Another brand I’m sure would be fine, but I’m sticking to this one.
  • Butter – UNSALTED butter. I have a preference for Trader Joe’s or Costco.
  • Shortening – Sorry, I had to go there. Buy the trans-fat free Crisco or if you really want to justify it, get the fancy non-hydrogenated Spectrum Palm Oil shortening (you might have to find a Whole Foods). Crisco is a little more forgiving for beginners, but I like them both.
  • Apple cider vinegar – I have no strong feelings here. I’m sure you can drum some up in your pantry.
  • Sugar – granulated sugar (just making sure no one considers brown or powdered sugar good for crust-making)
  • Salt – regular table salt. I realize it’s all the rage, but NO CHUNKY SEA SALT!
  • Plastic wrap/press-n-seal – something to put the crust in when done. Or if you’re like me and have been out of plastic wrap for months, use a Ziploc freezer bag.

#2 Freeze your fat

If you want crust-making to be as low stress as possible, prep your butter and shortening days or even just hours before you want to actually make the crust. For some reason, making crust seems much less complicated when I do this. Cut it up into small pieces, put it in a Ziploc bag or wrap in plastic wrap and throw it in the freezer.

I make packets of these so they are ready when I am.

Butter packet

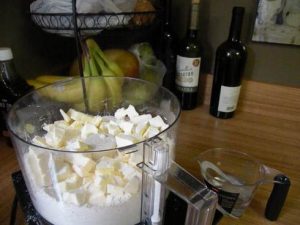
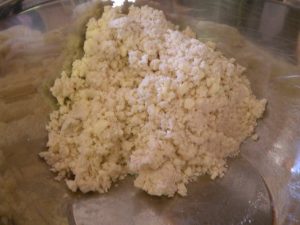
#3 Trust your instincts

Let me impart a little wisdom – you have the force, young pie-maker. The process of making crust takes mere minutes, but there can be so much angst wrapped up into those brief moments. If you pay attention to a few nuances of the dance, you’ll be ok. Here is a break down of EXACTLY how to do this (for one recipe of dough for two 9-inch pie crusts):
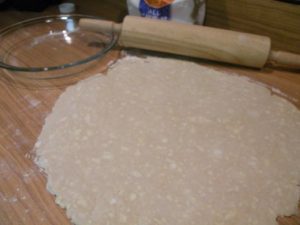
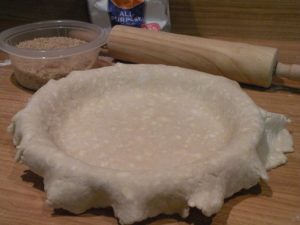
  • Fill a liquid measuring cup with 1/2 cup water then add 1 tablespoon of cider vinegar (I just splash some in without measuring). Throw in some ice cubes to make it cold. Or, if you are out of ice cubes (because my ice cube trays sit empty in the freezer for weeks), throw the cup in the freezer for a little bit.
  • Measure and place all dry ingredients into the food processor. Spin them around a few times by pulsing the machine to mix well.
  • Take your butter/shortening mix out of the freezer and scatter it across the top of the dry ingredients.

Crust tutorial

  • Pulse the mixture until it looks like coarse crumbs and the largest butter chunk is about the size of a pea. About 6-8 one second pulses. I tend to be a 7-pulse kind of girl. This is the point of no return, take a deep breath, a swig of wine and go. Your instinct comes in here because you need to LISTEN to how it sounds. Get all pie-whisperer and you’ll be able to tell a distinct difference between when it starts and when it’s done. Your first couple of pulses will sound clunky and chunky as the blade breaks up the butter. Then the next few will begin to smooth out, but it will still sound like the blade is chopping something. You want to stop short of it sounding sandy – that will mean you may have over-mixed it. Remember, there will be more mixing with the water – this is just the cutting-in of the fat. Remove the lid and using a butter knife, fluff the mixture a little to make sure that nothing is caught under the blade. You will also get a good feeling for the texture and consistency.
  • You’ve made it this far, so keep moving – it’s time to add the water and watch the magic happen. Your perfect crust is only a few pulses away. Remove the lid and add four tablespoons of the water/vinegar. Replace the lid and pulse the mixture about three times. This time, use brief, half-second pulses. Picture tossing it around, not mixing it. Like before, remove the lid and fluff the mixture a little with your butter knife, making sure nothing is hiding underneath the blade. Add four more tablespoons of water for a total of eight. Replace the lid and quickly pulse until the mixture JUST begins to stick together. The minute is starts to remotely glob together…STOP. It will look like it’s starting to fall into the middle from the sides of the bowl. Remove the lid and see if you can pinch the dough together. If you can, you’re done. If it still feels dry and crumbly and won’t stick together, you need a little more water.TIP: Dough with too much water is a better problem to have than not enough water. You can always help it with a little flour when rolling it.
  • Dump the mixture into a large bowl. It should come out looking a little crumbly – IT SHOULD NOT LOOK REMOTELY LIKE COOKIE DOUGH.
    Gently toss the mixture with your hand to make sure any patches of moisture get evenly mixed in. Then gently scoop the mixture to the side of the bowl making a mound of dough. Make two equal sized balls of dough and transfer each to plastic wrap, cover then press each into a disc. Refrigerate for at least an hour up to to two days.

Crust tutorial 2

Rolling the crust

This is where the best crust can get annihilated. Over-rolling, re-rolling or just super enthusiastic rolling can knock you down a few notches in the perfect crust category. Let the crust sit a room temperature for a few minutes. Roll the crust right away; it will crack. Roll it after it sits too long; it will stick. You can’t win. So, let it warm up just a tad before you start attempting to roll your beautiful 12-inch circle.

  • Flour yourself! Don’t shy away from using too much flour on the counter when rolling. You don’t want your dough to turn powdery white, but it’s ok to have a decent amount so it won’t stick.
  • Roll, turn, roll, turn, roll, turn.To avoid a perfect circle that is perfectly stuck to the counter, turn the dough after every roll or two. And while you’re at it, sweep a little more flour under the dough each time you turn it to be sure the surface is staying nicely dusted.

Crust tutorial 3

  • Once you have rolled a 12-inch circle, it’s time to make the big transfer to the pie plate. If you have done a good job of not smooshing your dough into the counter top, you should be able to gently pick up the rolled crust by sliding your hands underneath and transferring it right to the pie place. You are aiming to have about 1 inch of dough hang over. Don’t worry if you didn’t get a perfect inch of overhang or if some has good overhang and some sides do not. 
    Confession: I rarely get a perfect one-inch overhang. Trim the overhang to be as even as possible and tuck the edges under. Tucking the edges under is key to your crust looking pretty. This is also where you can disguise uneven edges. Crimp the sides using your fingers or a fork.

Crust tutorial 4

Refrigerate your lined pie plate for at least 15 minutes before filling and baking. You can also cover it and leave in in the refrigerator for a day.

See, that’s totally doable.  I promise, a homemade crust could be what’s standing in your way of a good pie and an OMG-give-me-your-recipe pie.  Now, go out and get your crust on this Thanksgiving!

One thought on "Crust or bust: A ridiculously detailed tutorial for those who are scared to make crust"

  1. sweetaddict says:

    Excellent tutorial, and written with humor, too. I might have to add homemade pie crust to my 2013 baking list.

Leave a Reply to sweetaddict Cancel reply

Your email address will not be published. Required fields are marked *

Pie Eyed Love on Instagram