I’m envious of people who have hard skills that they can offer to others. Whether it’s to make money, to barter or just to be nice, they have a skill that others need and they can take it anywhere.
I have benefited immensely from people like that over the years. Cousin Abby does hair (and saves me a fortune); Uncle John waterproofs basements, pours concrete and muds flawless drywall (and saves me a fortune); Father-in-Law Frank can paint a room with his eyes closed (and saves me time and a fortune); our good friend Matt is an electrician (and we owe him our first born grandchild for the time he has put into the houses we have owned); and Brother-in-law Aaron is a mechanic (and saves me a fortune and my sanity). How we got so lucky to have so many people in our lives who selflessly offer up their time and talent is beyond me.
I’m frequently left wondering what my husband and I can give in return. We just don’t have obvious hard skills that are in high demand. My husband is a middle school math teacher and I work in fundraising, and before that was a sex educator (yep). So between the two of us, we can teach your kid math, the birds and the bees and raise you money. I need my hair cut every 6 weeks, but how often does one need to give their kid “the talk?” My skills just don’t come in handy that often. As my hair keeps growing, our rooms need repainting and our house keeps falling apart, I continue to carry a certain degree of guilt for not having an equally sought-after skill to offer in return.
My point was driven home a year or so ago when our Leadership Team at my former job took a strengths assessment. We were doing some group therapy and read Strength Based Leadership by Tom Rath. As part of the experience, we took a survey to identify our primary strength. As we went around the table, my coworkers took turns discussing their strengths such as Strategic, Analytical, Developer, and Activator. Strong words that had obvious associations with hard skills that you need in the workplace. Then it was my turn to announce my primary strength…Woo. Woo? What the heck did that mean? Exactly what you might think. I can charm people, bring people in and develop interest and excitement. While that’s a lovely quality, it’s not a hard transferable skill! How many business professionals are out there touting their above average Woo skills? They’re not. They are DEVELOPING STRATEGIC plans, ANALYZING revenue cycles, ACTIVATING projects and seeing results. Not batting their eyes and being charming. I envision myself on a street corner with a sandwich board waving people in to get their taxes done. Now that takes a certain degree of woo factor.
My little foray into pie-making has started to help me fill this void in my life. All of a sudden, people are asking me to make them pie and I am gladly offering my services. I’ve been waiting so long to be able to do something for my friends and family. Finally, I can help with something that not many other people have the time, interest or energy to do. Pie! Look, I can still give a mean birth control presentation, but until anyone needs that, I’ll be in the kitchen.
Dorie Greenspan’s Devil’s Food White Out Cake
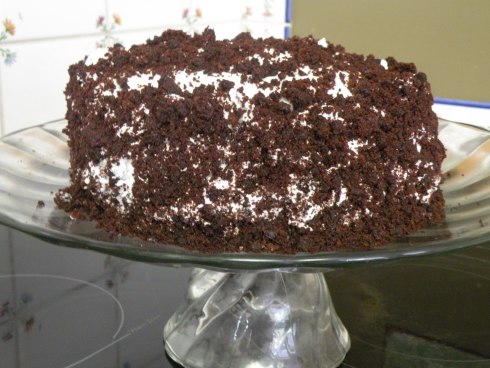
This is my all time favorite celebration cake. The taste, texture and presentation all seem just a little more special than your average cake. I hesitate to put Dorie Greenspan’s recipes on my blog because I really think you need to own her book, Baking: From My Home to Yours. But this cake is so good, I had to share it. We went to our neighbor’s house last weekend for a dinner party and I was asked to bring a cake. And not just a cake – the host’s birthday cake. No pressure there. I knew hands down that it had to be this one. The chocolate cake is moist and decadent. In between the dark cushions of cake is a fluffy marshmallow frosting that is the perfect balance of mild sweetness to compliment the chocolate. And the grand finale is the crumbled cake that you adhere to the outside making it oh so impossible to turn down a piece. Put this on your list of must make cakes this summer!
Ingredients
Cake:
1 1/3 all purpose flour
1/2 cup unsweetened cocoa powder (use the good stuff!)
3/4 teaspoon baking soda
1/2 teaspoon baking powder
1/4 teaspoon salt
1 1/4 sticks (10 Tablespoons) unsalted butter, room temp.
1/2 cup light brown sugar, packed
1/2 cup sugar
3 large eggs, room temperature
1 teaspoon vanilla
2 ounces bittersweet chocolate, melted and cooled (good stuff!)
1/2 cup buttermilk or whole milk, room temperature
1/2 cup boiling water
4 ounces semi-sweet or milk chocolate, chopped (or 2/3 cup mini chocolate chips – I like these)
Marshmallow Frosting:
1/2 cup egg whites (about 4 large eggs)
1 cup sugar
3/4 teaspoon cream of tartar
1 cup water
1 Tablespoon vanilla
Directions
Preheat oven to 350 degrees.
Grease two 8 x 2 inch round cake pans.
IMPORTANT: If you ever bake a cake again, please cut out two circles of parchment paper and place on the bottom of each. Grease the pan, lay down the parchment circle and grease the top. This will prevent your cake from sticking to the pan and will make the removal virtually flawless.
Sift together the flour, cocoa, baking soda, powder and salt. I love using the hand-held sifter that I bought at the grocery store. You just dump everything in, turn the handle and it all gets sifted together.
Using a stand mixer (or hand held if you need to), beat the butter on medium speed until soft and creamy. Add both sugars and beat for another 2-3 minutes. Add eggs one at a time, beating until each one is fully incorporated. Add vanilla. Reduce the mixer to low and add in the melted chocolate.
Starting with the dry ingredients, add the flour mixture and then alternate with the buttermilk. You want to begin and end with the dry ingredients. Be sure to have a rubber spatula handy so you can continue to scrape the sides of the bowl. Continuing on low speed, add the boiling water (I keep an electric kettle handy). The batter will be pretty thin at this point. Remove the bowl and using your rubber spatula, fold in the chocolate chips. Divide the batter between the two pans and make on the center rack for 25-30 minutes or until a toothpick inserted comes out clean.
Let cool in pans for about 5 minutes, then transfer to a wire rack and cool right side up.
If the cakes have a bit of a rounded top, use a serrated bread knife to gently even them out. Once cool, you will need to slice each layer in half horizontally. You can do this with a knife, but I love to take a piece of string or dental floss and gently guide it through the cake and out the other side. It makes for a clean, even cut every time! Keep the best three layers for the cake, and crumble the fourth layer into a bowl.
While the cakes are cooling, you can make the frosting. You will need a candy thermometer to pull this frosting off. Don’t be scared – it’s worth learning the technique!
Put egg whites in the bowl of a stand mixer. In a small saucepan, put the sugar, cream of tartar and water and stir to combine. Bring the mixture to a boil, cover the pan and boil for three minutes. Uncover and boil until the mixture reaches 242 degrees on the candy thermometer.
This is the tricky part. You want to try to time the egg whites with the temperature of the syrup. So, when the syrup reaches 230 degrees (I found 230 to work the best for me), begin beating the egg whites to stiff, shiny peaks. Once the syrup reaches 242, carefully pour the mixture into the egg whites while beating on medium speed. Try your best not to let the syrup touch the sides or the whisk attachment. Add the vanilla and continue to beat for about 5 minutes or until the frosting reaches room temperature. This is a good time to prep your cake layers and get ready to assemble.
Now for the fun part – assembling your cake! I love this cake because you do not have to be an expert cake decorator. The cake crumbles make the least artistic bakers like myself look like they know what they are doing.
Put the bottom layer cut side up on a cake round or platter. Cover it generously with frosting (you can probably be more generous than you think). Top with the second layer cut side up and frost away.
Place the third layer cut side down and frost the entire cake. This frosting is meant to be billowy and fluffy, so you do not need to fret about making it smooth and pretty (that’s my kind of cake!). Once the cake is frosted, you’re ready to bring on the cake crumbles. Using your hands, gently pat the cake crumbles into the sides and top of the cake. You can go lighter on the top if you want more contrast. This part is a little messy and you’ll probably need to clean up your counter or edges when you are done. Once the cake is finished, place in the refrigerator for one hour, or you can even chill it loosely covered for 8 hours.
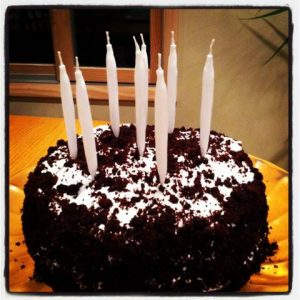
This cake was a hit at the neighbor’s dinner party. I even had a chance to use my inappropriate birthday candles that have been waiting for an adult-only occaision. Can you tell what they are? Joints. How funny is that? With my limited exposure to the topic at hand, I still react like a child and think things like this are hysterical. So when I saw these candles in a store a couple of years ago, I had to have them. Let’s just say that most everyone at the party caught on once they were “lit” and started to burn.
Joints or no joints, the cake didn’t stand a chance and was on its way to being eaten in no time. I hope you can find a reason to make this soon!