Enough about all of the books, blogs and articles that espouse how to make great pie. It’s time to put my hands in the bowl and get dirty.
Over the past month or so, I’ve made ten attempts at various incarnations of a pie crust (attempt number eleven is in the fridge as I type). I’ve landed on a pie crust recipe that is a hybrid of a few that I’ve had success with. There’s not much creativity in tweaking a pie crust recipe, but this one seems to have the right shortening to butter ratio for my taste.
Best of Both Worlds Pie Dough
For a 9-inch single crust
1 1/2 cups all purpose flour (Cold!)
1 Tablespoon sugar
1 tsp salt
4 Tablespoons (a little more than 1/3 cup) shortening (I like Spectrum palm oil shortening) (Cold!)
8 Tablespoons unsalted butter (Cold!)
* cut both of these into tablespoon-sized pieces
Just under 1/4 cup ice water
1 1/2 teaspoons cider vinegar (just add to the water)
Put the flour, salt and sugar into a food processor with a metal blade; pulse just to combine the ingredients. Drop in the butter and shortening. Pulse only until they are cut into the flour – don’t over process. It will look like some are the size of peas and some pieces might be larger. Gradually begin to add the water through the chute pulsing each time. Add about a tablespoon at a time. Watch carefully – you want to stop as soon as the dough can be pinched together. This will happen in the blink of an eye. The dough will not form in the processor like you would expect cookie dough to. It might even still look a little crumbly. If you can pinch it, turn it out onto saran wrap and form it gently into a ball. Wrap the dough, flatten into a disk and refrigerate for at least an hour.
In future attempts, I’m going to try a vodka twist and one that includes an egg just to spice things up.
It was all about apple pie this weekend. I mean, you can’t be a pie maker (or an American so I hear) if you can’t make an apple pie.
What didn’t work so well
This darn pastry mat.
It looked so amazing – promising perfectly round crust, easy to see measurements and a surface that wouldn’t stick. Not on my counter. It slipped all over the place – even when I tried to make it sit still with sticky putty. Not to mention the fact that the dough stuck to the mat despite plenty of flour. Back to the counter top.
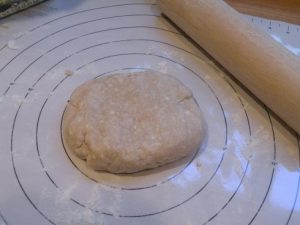
Rolling the dough.
Dough with shortening tends to be softer and crack less, but I was having a heck of a time with small tears when it was time to get the dough into the pan. But, I followed the advice and didn’t try to fix it. I just wrapped it back up and put it back in the fridge for 10 minutes, then tried again. I’m trying so hard to roll quickly, but firmly, but not too firmly, but firmly enough that I get a good 12 inch circle. I realized that I occasionally roll the pin off the edge of the dough and this creates very thin and uneven edges. So, now I go from the center out and stop before the edges.
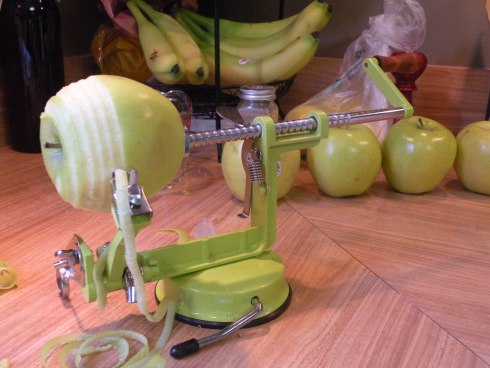
What worked well
This guy.
Oh how I love my new apple peeler! I know I’m not the first to own one of these, but I peeled 14 apples in no time. Life changing. Wonder if it will do a potato?

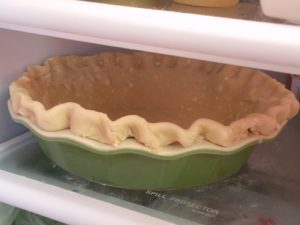
My crust crimping
I finally understand the technique to make a nice edge on the crust.
It took a diagram and some pretty ugly pies, but this time it clicked. You just make a “u” shape with your thumb and forefinger on one hand and place them on the inside rim of the dough. Simultaneously, you take the forefinger of your other hand and push it into the center of your other two fingers (gently). Just go look up a diagram… I still need to practice, but at least it’s presentable.
The recipe
Overall, the apple pie recipe that I used turned out really good. I took a technique suggestion and sliced and cubed my apples so that they would lay more compactly. The pie held together perfectly. Here’s the filling and topping recipes (taken from Pie by Ken Haedrich):
1 recipe pie crust of choice
Filling:
7 cups peeled and thinly sliced and cubed Granny Smith apples or mix of your favorite tart and sweet apples (turned out that one apple was pretty much a cup).
1/3 cup plus 1 Tablespoon granulated sugar
1 Tablespoon lemon juice
1/4 teaspoon nutmeg
2 Tablespoons cornstarch
Oatmeal crumb topping
1 cup all-purpose flour
1/2 cup rolled oats
2/3 cup firmly packed light brown sugar
1/2 teaspoon cinnamon
1/4 teaspoon salt
1 stick cold unsalted butter but into 1/4 inch pieces
1. Prepare your crust, roll to a 13 inch circle, place into a 91/2 inch deep dish pan. Gently tuck the dough into the pan and sculpt the edge. Place in refrigerator.
2. Combine apples, 1/3 cup sugar, and lemon juice. Mix well and set aside for 10 minutes. Preheat oven to 400 (I’ve been baking on convection and can really tell a difference).
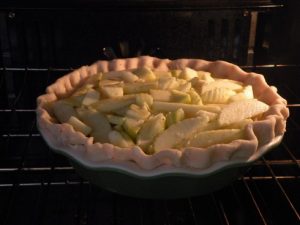
3. In a small bowl, mix the remaining 1 T of sugar with the nutmeg and cornstarch (I also added a hint of cardomom). Add the mixture to the apples and stir the fruit well. Turn the filling into the chilled pie crust (you’ll see a lot of liquid at the bottom of the bowl, but it all needs to go in). Smooth out the filling and place pie in the center oven rack and bake for 30 minutes.
4. Meanwhile, make crumb topping. Put the flour, oats, brown sugar, cinnamon, and salt in a food processor and pulse several times to mix. Scatter the butter over the top. Pulse repeatedly until the mixture resembles fine crumbs. Empty the crumbs into a large bowl then rub them together between your fingers until you have large, buttery crumbs (I forgot this part on the first pie, but the topping was still good).
5. Remove the pie from the oven and reduce the temperature to 375. Dump the crumbs into the center of the pie, spreading them over the surface with your hands. Tamp them down lightly (it will be a little thick and you won’t see much apple if at all). Return the pie to the oven, placing it so that the part that faced the back of the oven now faces forward. Bake until bubbly and brown on top – 30-35 minutes. Make a crust shield with foil if the crust starts to brown too much. I bought a silicone crust shield and it was worth every penny.
When done, transfer pie to a wire rack and cool for at least an hour. The juices need time to set so that the pie isn’t runny when cut.
The finished product (which I totally forgot to take a picture of!) turned out really good. It might have been close to perfect if it had less lemon. And the best part of all, the crust was GOOD!
On deck in the fridge: Banana Cream Pie…
I love you! xoxo :o)